Showing posts with label makeup tutorials. Show all posts

Wednesday, July 9, 2014

Makeup of the Day Tutorial & E.L.F. Mineral Eyeshadow Review

Since my posts yesterday involved GOLD, I thought I would follow that theme over in my makeup today.

Being that I love all things glitter (it is a color choice in my book), of course I love shimmery makeup, too :)

Today I am going to show you a gold and purple eye makeup tutorial that I love doing in the summer.  I like golds, teals and corals in the summer especially.  I think they go great with golden tan skin.

I also want to talk about the mineral eye shadow line from E.L.F.  If you aren't familiar with this brand, E.L.F. stands for Eyes, Lips and Face.  It is a wonderful line of makeup that is also the cheapest priced around.  The eyeshadows featured today are only $3 each!

My four favorite colors are Golden, Dreamy, Socialite & Smoldering.


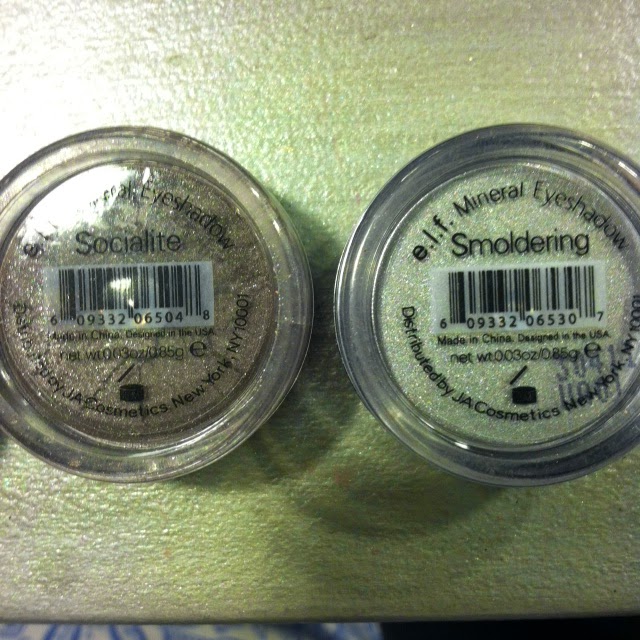
These ones are all shimmery shadows, but they have tons of other color options in matte finishes as well. The staying power on these shadows is incredible.  I know a lot of people don't tend to use eye lid primers, but even if you don't these babies will still have high power color on your lids all day!  They can be worn dry or wet and have Vitamins A,B,C & E in them.  There is a bit of fall out when applying, so I always use a card when I am putting it on to ensure it doesn't get on my face. The coverage is build-able so you can use a little or a lot depending on the look you are going for.  And again they are $3 ladies!!


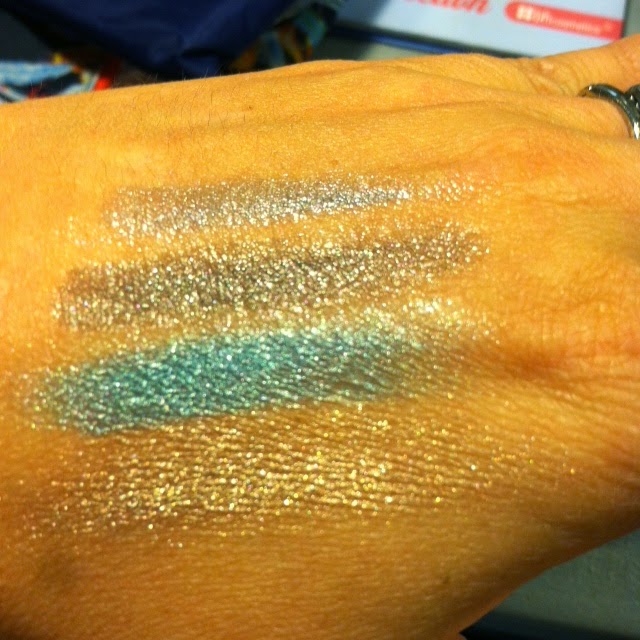
From bottom to top: Golden, Dreamy, Socialite, Smoldering

You can get them HERE.

Now on to the Makeup of the Day!!


I knew I wanted to go for a gold and purple kind of sunset eye look.

Here are the products that I used:

BH Cosmetics purple eyeshadow from the Hollywood Line
E.L.F. Golden shimmer mineral eyeshadow
E.L.F. Plum Passion shimmer eye liner
Benefit They're Real Mascara
Cover Girl Bombshell Shine Shadow in Gold Goddess

First I want to start out by letting you know I use the CoverGirl Bombshell Shine Shadow as a primer!  I know, crazy, right?  I received this product in Ice Queen in a limited edition Birchbox and I don't normally wear silver eyeshadows.  But I liked the pigmented shine that it gave me so I started using it as a primer on my eye lids and my shadow stays on ALL DAY LONG since I have started using it.


Gorgeous colors!  They can be spread out super, super thin for the slightest shimmer too or you can create a heavy color look.


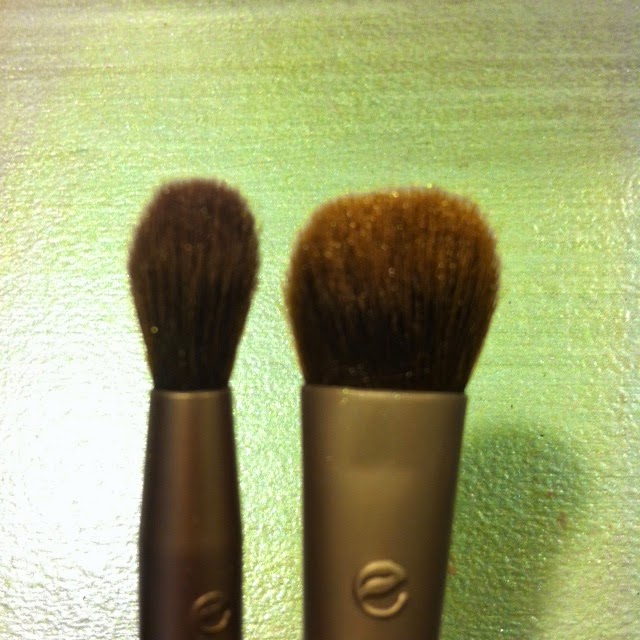
Remember the post I did about Brush 101?  Well these are the two brushes I used, the highlighting brush and the large eye lid brush.  I used the highlighting brush just for the crease of my eye, so you can also use a c brush or an angled brush.

Here is my sampler pack from BH Cosmetics and the purple eyeshadow.


And of course, Golden by E.L.F.


So here is how the CoverGirl Golden Goddess looks alone on my eyelid.


Shimmery yet a bit wet looking.

Now here is when I put the E.L.F Golden on top of it.


Just lovely!!

Now I will take the purple and with my eyes looking straight ahead, brush the purple into the crease of my eye lid stopping at the center of my eye.


This is how it looks when I am looking straight down.

Then I take my E.L.F. Shimmer eye liner and line my bottom and top lids.


Curl my lashes and two coats of Benefit's They're Real mascara.


TA DA!!


Perfectly golden with purple accents!!

Now of course I will say that I am wearing this look for day time and also to work.  Had I been going out or it was the weekends, I would be a little more heavy handed with the shadow, mascara and eyeliner :)

Overall, I tend to wear colored liners and mascaras.  I also use a cream colored liner on my lower waterline to brighten up my eyes. I think black liners on the lower lid makes the eyes look smaller and darker.  In an upcoming post, I will show you how to do the perfect cat eye, a super simple way!

What are your favorite E.L.F products?

What are your favorite colors to use in the summer?

Let me know in the comments below!

Have a great day!!


Friday, June 27, 2014

Let's Talk About Eyebrows, Baby.....

Do ya'll remember 90's eyebrows?  Pluck them so thin that you barely have any left?  Who decided that looked good?  Let's find that person now....No one told us that sparse thin eyebrows look good on NO ONE and getting them to fill in is nearly impossible, much grow back completely.


Ah, brings back memories now doesn't it???

Well, don't worry, today YOU are going to learn how to fix your eyebrows.

And don't think extreme like Cara Delevingne, normal, just normal eyebrows :)

You know, having nice filled in eyebrows will completely change the way your face looks.  That is a fact.  I am giving you my 100% guarantee on that.  Your eyes are the window to your soul, right, so why not have them framed with some beautiful eyebrows?  If that doesn't convince you then, how about this? Nice eyebrows are a sign of youth.  BAM! You want to stay looking young, right?  Yep.....okay, let's do a natural eyebrow tutorial together :)

I hardly had anyone to talk to about what products to use for my eyebrows so luckily I have done enough research and tried enough products to be able to help you now.  There are many types of products, too. Pencils, gels, powders and liquid wands.  

The first and hardest thing I am going to recommend is letting them grow out a bit.  I KNOW this is the hardest because we want to pluck all the stray hairs.  In reality, hardly anyone sees them but us.  If you let them grow in for about two weeks it helps a lot and shows you where your brows should actually start and end.

Now let's do the pencil trick to help us determine that even better.

Courtesy of wikiHow

Take a pencil and place it on the outer most corner of your nostril and the inside of your eye.  This is where the brow should start.  Make a dot with some eyeliner.

Courtesy of wikiHow

Keeping the pencil at the same spot on your nostril, tilt it across the center of your eye, looking straight ahead.  This is where your arch should be naturally on your face.  Make another dot.

Courtesy of wikiHow

Lastly, tilt the pencil to the end of your eye.  This is where your brow should end.  Make another mark.

Do the same thing with your other eye.

Now, there are stencils that you can use to help you shape your eyebrow.  I used them for quite some time until my eyebrows had grown in enough for me to shape them on my own.  I still recommend using the pencil trick as some stencils are larger than what you actually need.  They are also good in helping you pluck the hairs outside of the stencil so you aren't plucking too many within what should be the natural shape of your brow.

Now that we have determined where your brows should be, lets talk about the colors.

  • If you have light hair and light skin, you should go one to two shades darker than your hair color. Going lighter will not help define your eyebrows.
  • If you have dark hair and dark skin, you should go one shade lighter than your hair color, two at most. 
If you need additional help, I would ask your hair stylist or ask someone at Sephora, Ulta or Benefit's brow bar.  When I first started doing my eyebrows, I was using a brown eyeliner pencil and quickly learned that it was WAY TOO DARK for me.  

Next I tried, Too Faced Brow Envy Kit.  It is actually a great kit and comes with tweezers, stencils, spoolie brush, highlighter, wax and two powders.  A great starter kit!  I stopped because it was too hard to mix colors to find the right shade for my blonde hair.

So then, I started out using Anastasia's Perfect Brow Pencil in Cool Taupe.  Taupe is an almost perfect option for us blondes.  It is nice and cool toned and I think the best shade.


I am actually returning this so I just wanted to show you the product :) 

This is a pencil that also has a spoolie brush, which is what helps your brows look natural after you fill them in.

But now here is my favorite product!!  I actually got this recently has a promo from ULTA.


IT Cosmetics Universal Brow Pencil.  Universal, ya'll!!!  The color is incredible.  This is what I recommend for trying out a color.  The darker you press, the darker the shade becomes so it is flattering to all women.  It goes on as a taupe color (IMO) which is perfect for me!


Now you can see the spoolie brush I was talking about.  The tip is kinda square, but small enough to mimic your natural brow hair, which is what we want.  Unfortunately, it is not waterproof for summer but the next product I use is!


Make Up For Ever Aqua Brow.   For this I also recommend asking Sephora to help you out with coloring as they can try the colors on you in store.  Light brown is what worked for me.  Application is with an angled brow brush and you just pat it on.  It lasts all day.  I plan on putting it to the test in the pool on vacation :)

So here are my brows, au natural.  Remind me to work on the lighting at my vanity for pictures!


Thin, no shape....ugh.....Oh and another thing I learned is "eyebrows are sisters, NOT twins".  Remember that as you will never get them to look the same unless you have them tattooed on.  They are unique :) Don't stress yourself out trying to get them to match.


My whole face without my eyebrows done.  I took the picture from far away so you will be able to see the difference once they are filled in.  Hard to see them, right?

Take your product and lightly fill in your brow in short strokes, following the shape of your brow based on the marks you made from your pencil.  If you are using a stencil, only lightly draw in as we are going for a natural look here, not an eyebrow made with a sharpie.  Your eyebrow should get thinner as you get more towards the end.  Fullness in the beginning :)


Now the left is filled in.


We are getting there!


And now the right.


After the color is put in, take the spoolie brush (or an old mascara wand that has been cleaned up) and brush your brows so the color is distributed naturally.

The next thing I do to add a little OOOMPH, is put highlighter underneath my arch.  Adds some extra lift without the botox :)

Benefit's High Brow does the trick or you can use any highlighter that you have, including an eyeshadow.


Just draw some directly under the arch.


And then blend it in with a brush or your finger.  You can also use your concealer on the top and the bottom of the eyebrow too.

Done!!  I do plan on creating video tutorials soon and I will update this post at that time so you can actually see me doing my eyebrows :)

What eyebrow products do you currently use?

What are your favorite brands?

Please let me know in the comments below!

Have a great day!!


Tuesday, June 17, 2014

How Not To Have An Oily Face


No, this post is not a joke, but the picture is! I am sure I am not the only one who as you get older, your face becomes more oily??  Yes, no??  Well I am going to think that I am not alone in this battle :)

So today I want to show you how to keep your face matte and not get such oily skin after applying makeup plus show you makeup for an oily face.  And not with home remedies, although they might work, there are too many to pin them all down.  I know before I found these things that work for me, I searched high and low for some help in this area!  And NO the answer is not those oil blotting sheets.  Who has time to actually do that...."You know, I am really loving this first date but excuse me while I go blot the oil off my face"......HA!!

First you want to start with a product BEFORE your primer! This was a miracle product for me!


Murad's Oil Control Mattifier.  Get It Here.

This product not only reduces shine but it also controls breakouts and reduces them.  The key to this is patting it on your face and not rubbing it in, although the consistency is like a lotion.  Since I found this product, I have never had to use an oil blotting sheet again!

Second is a primer.  You would't drive your car without putting oil in it, right? (Is that an appropriate reference? haha)

Basically, a primer is going to fill your pores and any fine lines you have and provide a clean, smooth canvas for your face.  These two products combined take me less than 5 minutes to do, so you DO have time to add them to your routine!


Now, I am privy to Benefit's the POREfessional (Get It Here), but I recently tried a sample of Smashbox's primer Get It Here) and it was pretty good, too.  I like that the POREfessional is the same color has my skin so if I had a pore emergency during the day, I can put it right on top of my foundation :)

Next is the foundation!!  Now I am going to show you my winter foundation and summer foundation.  As ya'll know, we need to have two due to the weather.  Plus my winter foundation is so expensive, I do not want to risk sweating it off!

Winter/Fall Foundation

Summer/Spring Foundation
Hourglass Immaculate Mattifying Oil Free Foundation (Get It Here) and Benefits Liquid to Powder Foundation (Get It Here).  As you can see from the names alone, they are targeted for oily slicks on faces! :) They don't dry me out, either which is great :)  But my face has never looked better!

Now with the Hourglass, I use a Beauty Blender (Get It Here) for application.


And with Benefit, I use a stippling brush (Get It Here).


If you know a better way, then please let me know in the comments below!!

Lastly, I apply a colorless powder on my face.  Elf's HD powder (Get It Here).


And that my friends is how I maintain an oil free face, ALL DAY!!

How do you fight the oil?

What are your secret weapons?

Do you need to know how to use the tools?

Please let me know in the comments below!!

Have a great day!!


Blogging tips