Showing posts with label do it yourself. Show all posts

Monday, June 16, 2014

DIY Summer Wreath Tutorial


Since I have gotten older (still young, but older), I love to decorate my home for each holiday.  I like the whimsical feeling of it and want to start now before I have children so I can follow the tradition with them, too.  In fact, the kiddos will be making all sorts of crafts, they have no idea!! :)

So, since it is June and the Memorial Day wreath is down and it is not time to do the 4th of July wreath, I wanted to make something for the in between time. So today here is a DIY Summer Wreath Tutorial.

Michaels is always having great sales.  And if they are not, then my go to store is Hobby Lobby.  My total for the supplies for this wreath was roughly $30.  You are not going to find a wreath like this for that price and if you do, let me know!!

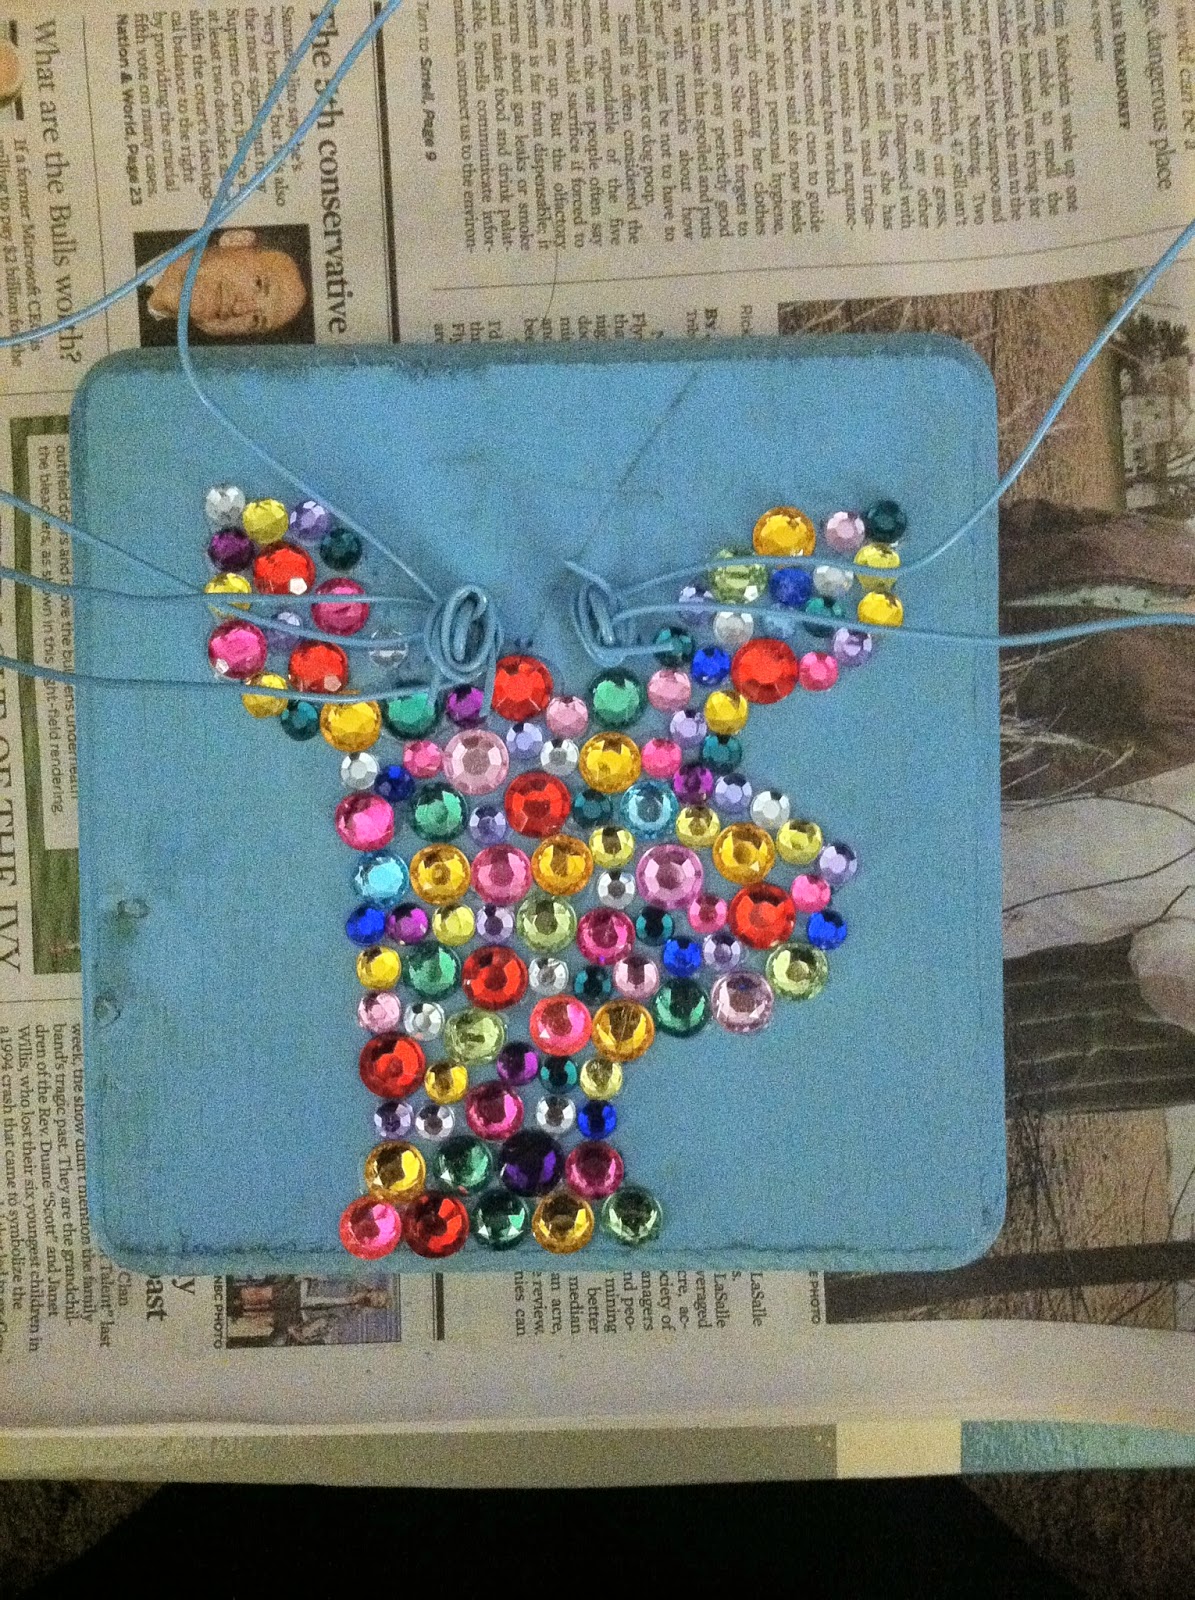
I already had the vision in my head of what I wanted.  I wanted something country (of course!), something purple and I wanted the letter "M" for our monogram.

So here is what I found:


  • A wooden wreath
  • Sprigs of purple and white flowers
  • A monogram
  • Ribbon
  • Adorable lovebirds
  • Wire beads
  • Spray Paint
The first thing you want to do is actually lay out the items on the wreath before you start gluing them on.  Get creative and be inspired!!  Move things around, change the layout, now is the only time before it becomes permanent :)


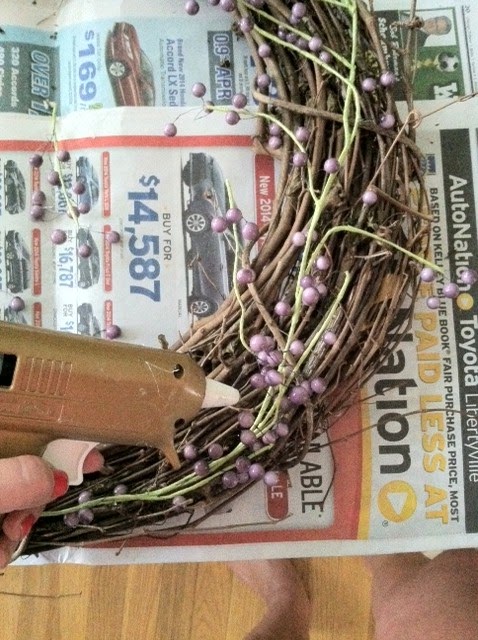
First, I know that I want my "M" to be purple and it will take 30 minutes for the paint to dry, so I am going to paint that first.


Now I will go back inside and cut off all of the excess greenery on the flowers.  I only keep a very small piece attached to the flower as I will just be sticking the flowers behind the twigs.


Then I will glue on all of the pieces!! Simple as that!!


Halfway there!

Now I will attach the accent pieces.


Look how adorable these love birds are!!  I can't stand it!!


These actually came with clips on them so I didn't have to wrestle them and get them to stick to the wreath, thank goodness!! :)

Lastly, I just wrapped the ribbon under the flowers, across the top to hang it on the door with.


TA DA!!


What type of holiday decorations do you do?

Do you have a go to summer wreath?

Let me know in the comments below!!

Have a great day!!

Thursday, June 12, 2014

DIY Stag Jewelry Holder

Good morning!!!  I am so excited to share this tutorial with you and to show you just one of the wonderful DIY kits available from Darby Smart.  As a reminder, this is $19 a month for the monthly "surprise" boxes or you can order whatever kits you want directly on their site.  This kit is $29 but with the discount email I received (they send them all the time), I only paid $9 for it!!!  Using the link above will get you $10 off your first purchase!!


Now, as you can see the kits include all of the materials needed for this project, plus enough to do another project too!  I am going to show you step by step so you can buy the items separately from your local craft store if you don't want to buy the kit as a whole.

Here are the items laid out.


Gems, spray paint, E6000 glue, eye hooks, brackets, wood block

Wire, 3 in 1 multi tool, extra bag of gems and spray paint (this is not needed for this project)

The first thing that you want to do is draw the shape or outline of how you want to place your jewels on the piece of wood. I did this free hand.


Put two x's where you want to place the eye hooks.  The eye hooks are where you are going to have the wire "antlers" coming off of.  Then screw in the eye hooks.  Make sure that they are vertical when they come through the back end as that is what you will attach the brackets to hang it on the wall with.


Next you want to shape your wire.  You may want to use gloves to do this.  And this is the hardest step.  Hard in the sense that you want to stretch out your wire as long as you will want it and then curve the wire to form the "antlers".  Just put some muscle into it..or sweet talk it so that it will move where you want it to! :) 

This template was included in the kit but it is not necessary.  This just gives you an idea of how long they can be and what shape to form them to.


Here is my husband showing how to form them

Once you have formed the antlers (remember to double since there are two eye hooks), wrap the end around the eye hooks, tightly.


Here is a Paisley photo bomb! 
Next you are going to spray paint the board and the antlers.  I decided to outline my stag so that it would be easier to see once it was painted over.  You can choose not to do this and just apply a light coat of spray paint.  I decided that I did not want to paint this twice and that is why I went for darkening the outline.


I also decided to do the entire block with spray paint, that way the space between the gems would not show wood behind it.  Once the block was painted, I then painted the antlers so that they had gold tips!


Next you are going to apply the gems and bling it out!!  You can either put glue on the wood and attach the gems or you can put glue on the gems one by one.  I went with putting the glue on one by one and it was a bit tedious haha.

Although it is hard to tell in this picture, the block is all blue


And here is the finished product!!!


I tested the strength with necklaces and the antlers did not move.  If yours move, I would suggest just gluing the wire that is wrapped around the eye hooks for some stability.

I truly cannot say enough wonderful things about Darby Smart.  As you can see by the note in the box they sent me, due to inventory this kit took a little while longer to arrive and they not only gave me a coupon towards my next purchase for $15 off but they also included an extra bag of paint and gems for my next jewelry project! The customer service and quality of their products is exceptional!!  Use the link above to get $10 off your first purchase!!

What are your favorite crafts to do?

Do you have a homemade jewelry holder?

Have a great day!!

Tuesday, June 10, 2014

The Do It Yourselfer

I have never had an artistic bone in my body.  That's my brother.  He is amazing. Ask him to draw anything and it is effortless for him. I have always been the drama queen in the family and love to act and sing and dance.  Okay, I STILL AM the drama queen :)

When my father passed away, I needed something to do. I needed something to take my mind off of the pain but keep busy at the same time and have something to show for it.  That is also about the same time I became aware of Pinterest.  So needless to say it was a dangerous time for me.  I started finding things that I never even knew that you could do with regular household items and I started doing them.


In addition to my monthly beauty subscriptions, I also have crafting subscriptions.  These are surprise DIY boxes that come with all the tools and supplies that I need for a project, mailed to my door.

The first one I love is Darby Smart and it is only $19 a month.  If you sign up with this link, you will get $10 off your first order.  They are constantly emailing discount codes and special offers for the boxes that they sell online (which are different than the monthly boxes) and they have a showroom where they will feature the crafts that you have done.

Here are some of the recent ones that I have done.


The tools and supplies that they send are usually enough to use for future projects and not just a one time thing.  And I love the variety of the boxes.  I currently have a box on the way for a craft I will feature in another post, too! :) They also have great customer service.

The second craft subscription I do is Whimseybox and it is only $15 a month.  If you sign up with this link, you will get $5 off your first order.

I just started this subscription and this is my first box.  I am hopeful that they will be just as good.


Again, there are plenty of supplies that will be able to be used towards future products.  They have a whole community on their website where you can interact with other crafters, too.  They also have very good customer service.  

Joining these subscriptions has helped me in so many ways. I never thought that I would know how to stamp metal and make jewelry.  Plus, it helps me get out of my head for awhile and I know that my dad would be proud of the things that I have made.

Anything that is sold at the store you can make yourself and make it the way that you want with your own style.  Don't be afraid to try!!  I make jewelry all the time now and I do owe it all to Darby Smart!!

Have you subscribed to these subscriptions too?

What are your favorite crafts to do?

Have a great day!!

Monday, June 2, 2014

Welcome!

First, I'll explain that mudpipes is another word for cowboy boots.  I'll also explain that while I was born in Chicago, IL, I have the soul of a southerner, thus my love of all things simple and country western.  This blog is going to be a mix of beauty, crafting, product reviews, tutorials and all around good stuff. Plus you will get to meet my wonderful husband, Nick and puppy, Paisley throughout my ramblings...  I hope ya'll enjoy :)
 
Blogging tips