Showing posts with label nails. Show all posts

Tuesday, July 8, 2014

Ciate Denim Manicure Tutorial & Review

Happy Tuesday everyone!!

I hope ya'll had a wonderful holiday weekend and a great 4th of July :)

Today I am going to show you quite possibly one of the coolest manicures I have ever done!  The Ciate Denim Manicure.  (PS-the gold and blue theme will continue over to the next crafting post!!)

It is amazing and super easy!!  Get It Here!


As you can see, yet another wonderful idea from Ciate that comes with everything that you need to rock a denim mani!!

The kit comes with a beautiful blue polish that kind of drys to a matte like denim texture, gold and bronze studs, gold and white stitching templates and the nail glue.

First you are going to want to paint your nails with two coats of the polish.


Then you are going to use your imagination and decide how you want each nail to look :)  That is the fun part.

You will take the paper with the stitching on it and cut the appropriate size you want for the corresponding nail.

You then take the piece and dip it in water for 10 seconds.


When you take the paper out of the water, you will slide off the transparent top (exactly like a stick on tattoo, I am sure we have all played with those!).  Lay it on your finger, and tap it to adhere it to the nail.


I mean, how cool is that!!


Since I used the white first, I then went over some of the fingers with the gold stitching.


Next pick the studs that you want to put on.  I found it was super easy when I used tweezers to pick them up and to put them on.


There are so many options, it is really hard to choose.

Dot some of the nail glue right on the stud.  The directions say to put the glue right on your nail, but I found it very hard to get them to stick that way.

Put the stud on the glue on your nail.  Press down for 10-15 seconds.  Then cover the whole nail with a top coat.  I used a fast dry top coat.


Finish decorating all of your nails and then add a second top coat to ensure everything will stick on really good!! :)


TA DA!!!

How incredible does that look?

Overall, this was the best manicure kit I have used from Ciate yet.  It was super simple and really came to be quite stunning.  I really don't think that any of the studs are going to come off any time soon.  The nail polish is just so pretty too!

Have you used the denim manicure kit?

What is your opinion of it?

Have any tricks?

Let me know in the comments below!

Have a great day!!


Wednesday, July 2, 2014

4th of July DIY Nails

wreath courtesy of my mother in law :) 
 JULY has arrived ya'll!!!  That means Summer is here. I love Summer.  I love the sun and being tan and wearing dresses.  I love warm nights under stars and going to county fairs :)

Every year, my husband and I go down south to Kentucky to spend the 4th with his family.  We are leavin tomorrow!  We stay with his aunt and uncle who have a horse farm,  Shaker Ridge Farms.  It is wonderful.  We spend most of the time in the pool and taking pictures with the youngen's and the horses.  And then we shoot off fireworks :)

Here is my adorable nephew, Sean :) 

I knew I wanted to do my nails with a 4th of July theme so today I am going to show you a simple DIY, 4th of July nail tutorial.


Here are the supplies.


I brought out the big guns as I didn't really have a plan going into this :)  Now, really all you are going to need are:

Blue nail polish
Red nail polish
White nail polish
Glitter (of course!)
Stick on stars
Top Coat
Dotting Tool or Toothpick or Pen

Lucky for me, GlossyBox gave me the PERFECT colors.  I have been searching for a navy color for so long, this really came just in time :)


My white is from an As Seen On TV kit I got at Walgreens,  Hot Design Nail Pens.


What's nice about these is they have the brush for painting and the pen for designing on the same end.  And as of now, it is the truest white I have.

My packs of glitter and my brushes came from KISS Nail Art Kit.


Okay, so first I painted my pinky and index finger navy blue.  Then I painted my ring finger and my thumb red.  And finally, my middle finger white.


I decided I wanted to put glitter on my ring finger as an accent finger.  So while the nail is still wet, sprinkle some glitter evenly over the nail.  Tap off excess.


I wanted the white finger to be the star of the show with the silver stars on them.

Take the dotting tool (or whatever you are using) and dab it with your top coat nail polish to pick up the stars.


Then dab the star onto your finger.  Again, do this while the white nail polish is still tacky to ensure the stars will stick.


Make sure you count how many stars you have.  I did not.  So I have 5 on one finger and 3 on the other finger :)

After the deco part of the nails is done, cover each finger with your top coat to seal everything in.

Done!!


What are your 4th of July plans??

Do you have a go to holiday mani or pedi?

What are your favorite brands to use?

Share with me in the comments below!!

PS-Congrats again to Dorene R., the WINNER of the Beauty Package Giveway Contest :)  I had so much fun with everyone that I can't wait to start on the next one :)

Have a great day!!!


Wednesday, June 18, 2014

JAMBERRY & EVOLOGIE Reviews

As I am a relatively new blogger, I am trying to get the word out there as much as possible.  And with your help it WILL happen! Actually, thank you all for making it so successful after only two weeks!  I have had 716 views already :)  Wonderful!

So today is a post about two companies that have sent me some products to try, free of charge.

Last week, I wrote a post about nail wraps.  I was then in contact with Jamberry.  Jamberry is a nail wrap company that provides a DIY at home application with an incredible variety of designs.  In fact, I have never seen so many nail wrap options!!  You can learn more about them here.

Here is what was sent to me.


This is just a small sample of some of their designs.

In fact, here is the back page of the pamphlet that was included.

Watermelon, Queen Anne, Leopard Tips???  I LOVE THEM!!!

There are so many patterns, styles, colors and shapes to look at, this doesn't even come close.
Check out the designs here!

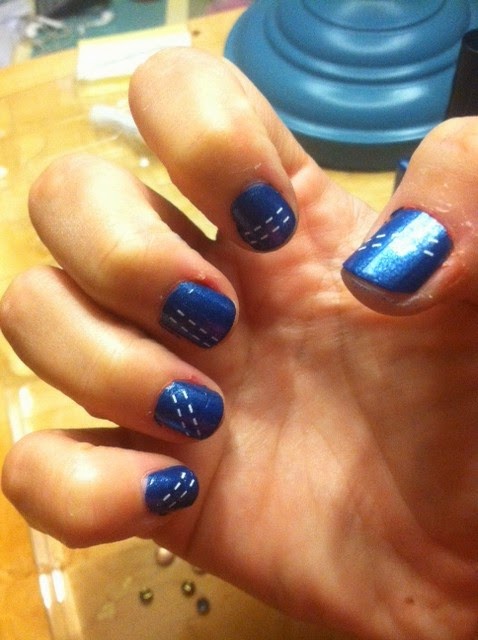
Now, of course, when I got my samples I could not WAIT to try them.  Since I have been using nail wraps for a while, I thought they would be just like all of the others.  So I peeled off the pattern I wanted for my one nail and placed it on my finger.


Clearly, there is enough product here for me to do two nails and that is what I planned on doing.  Since a nail file nor instructions came with my sample, I just did what I always did and cut the excess and manipulated it on my finger.  This is not as flimsy as some other nail wraps I have used so I had a bit of difficulty but was able to make it work.


In retrospect, I should have gone to the website, but it was late and as always I am trying to get my nails done before I go to bed as it's the only time I have! :)

Here are the proper application instructions:

I am now going to have to do this next time and update this post!  But even though I applied them wrong, they still looked great.  I love how they are glossy, like my nails as most nail wraps don't match the polished nails so it definitely looks like they are stickers.

I was also skeptical on the sizes, as I did not think I would be able to use all the samples provided but now that I know I can use heat to stretch them out, I am sure I can!

You can place an order and buy 3 and get 1 free here!

What's also great, is you can become a hostess for a Jamberry party or join the team and be a consultant and get perks and compensation!! Who doesn't love free stuff!  Click here to join today!

Request a free sample HERE!  Please tell Sarah my blog sent you! :)  Her email is at the top!! :)

What nail wraps have you used?

What is your favorite pattern?

Let me know in the comments below!

The second company that I was in contact with was Evologie.  Evologie is an acne treatment that comes in a step by step program.  They have a variety of stay clear products.

This is what I was given.


I spoke with Joann Cardello, who is amazing by the way! I told her the products that I have used and she explained to me why Evologie was different.

Many skincare products contain chemicals like benzoyl peroxide, which work only
on the surface of your skin.  As it extracts the oil, it dries the skin,
creates micro cracks at the surface (allowing bacteria to enter) and the
dryness causes your skin to produce more oil.  The excess oil production
and the new bacteria encourage new pimples to form.  So, these products
may work short-term, but they are not sustainable results and may come at
the cost of damage to your skin.

Evologie does not have benzoyl peroxide.  It works gently and naturally to
clear your blemishes at the surface and retain the water molecules so your
skin stays hydrated.  Evologie's YS3 complex also works beneath the
surface of your skin to prevent blemishes where they start and retain your
skins healthy level of hydration. Therefore, your skin is not dry and it
does not produce excess oil - so you can have clear AND healthy skin
long-term.


Now, I have been using the Intensive Blemish Serum (INTENSIVE BLEMISH SERUM is a potent treatment that rapidly resolves blemishes and pimples) and the Stay Clear Cream (STAY CLEAR CREAM keeps skin clear, moisturized, and helps reduce breakouts, post-blemish scarring, and skin discoloration) for 2 days now.  Because (OF COURSE) I had gotten a few pimples to test the product with! And in all honesty, the pimples never made it past the surface of my skin!  So, no painful pimples to deal with or be embarrassed about!  Plus the Stay Clear Cream is so moisturizing, I don't have patches of dry skin on my face that can happen with other products I have used.

The biggest concern I had was that all natural products would not be powerful enough and that I would break out more because I was introducing a new product into my skin.  NOPE!  Didn't happen and I am very pleased with the results so far!

You can get the products here!  Or if you want to get some Birchbox points, here!  Shipping is free on both sites but it does look like the better value currently is with Birchbox.

What do you currently use to manage acne?

Are they all natural?

Let me know in the comments below!!

Have a great day!!


Blogging tips